Tutorial for Radius Dimensions
Please read the Tutorial for Linear Dimensions before, if you haven’t.
Note
Ezdxf does not consider all DIMSTYLE variables, so the rendering results are different from CAD applications.
import ezdxf

# DXF R2010 drawing, official DXF version name: 'AC1024',
# setup=True setups the default dimension styles
doc = ezdxf.new("R2010", setup=True)

msp = doc.modelspace()  # add new dimension entities to the modelspace
msp.add_circle((0, 0), radius=3)  # add a CIRCLE entity, not required
# add default radius dimension, measurement text is located outside
dim = msp.add_radius_dim(
    center=(0, 0), radius=3, angle=45, dimstyle="EZ_RADIUS"
)
# necessary second step, to create the BLOCK entity with the dimension geometry.
dim.render()
doc.saveas("radius_dimension.dxf")
The example above creates a 45 degrees slanted radius Dimension
entity, the default dimension style “EZ_RADIUS” is defined as 1 drawing unit
= 1m, drawing scale = 1:100 and the length factor = 100, which creates a
measurement text in cm, the default location for the measurement text is outside
of the circle.
The center point defines the center of the circle but there doesn’t have to exist a circle entity, radius defines the circle radius, which is also the measurement, and angle defines the slope of the dimension line, it is also possible to define the circle by a measurement point mpoint on the circle.
The return value dim is not a dimension entity, instead a
DimStyleOverride object is
returned, the dimension entity is stored as dim.dimension.
Placing Measurement Text
There are different predefined DIMSTYLES to achieve various text placing locations.
The basic DIMSTYLE “EZ_RADIUS” settings are:
1 drawing unit = 1m
scale 1:100
the length factor
dimlfac= 100, which creates a measurement text in cm.uses a closed filled arrow, arrow size
dimasz= 0.25
Note
Not all possibles features of DIMSTYLE are supported by the ezdxf rendering procedure and especially for the radial dimension there are less features implemented than for the linear dimension because of the lack of good documentation.
See also
Graphical reference of many DIMVARS and some advanced information: DIMSTYLE Table
Source code file standards.py shows how to create your own DIMSTYLES.
The Script dimension_radius.py shows examples for radius dimensions.
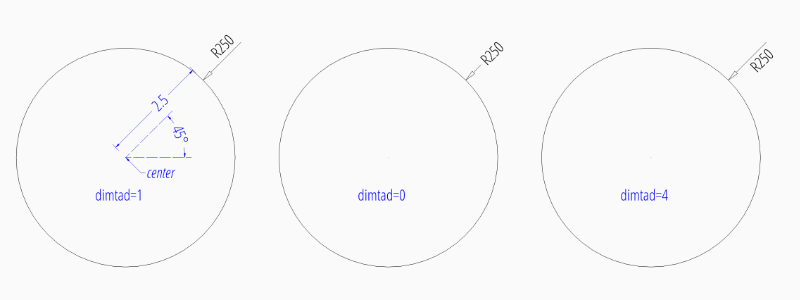
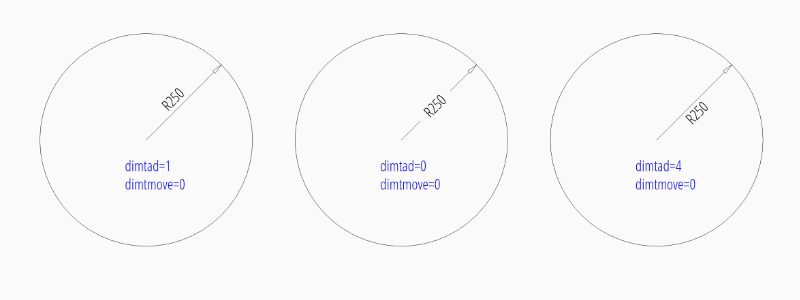
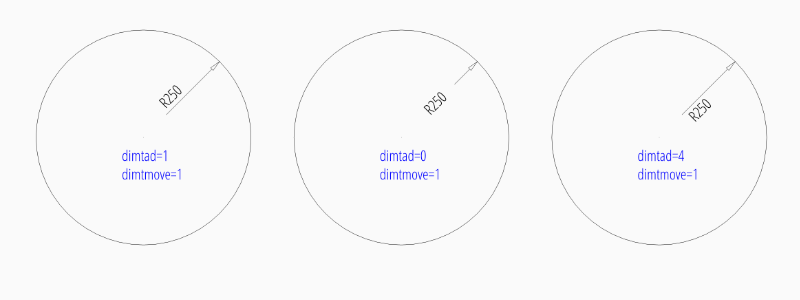
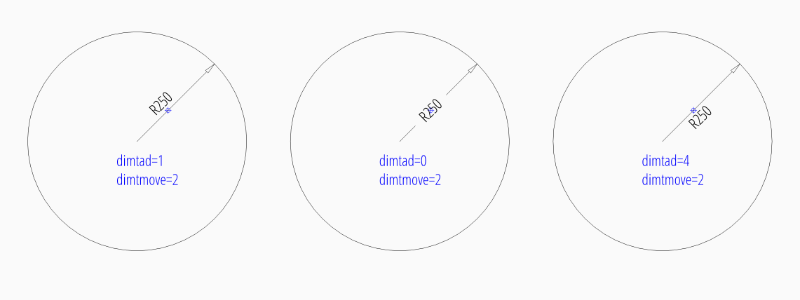
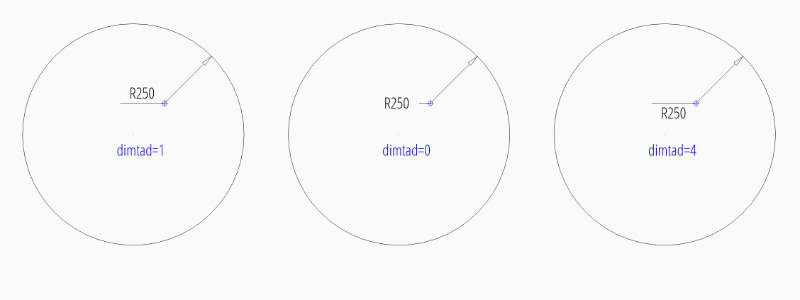
Default Text Locations Outside
Advanced “EZ_RADIUS” settings for placing the text outside of the circle:
tmove |
1 = add a leader when dimension text is moved, this is the best setting for text outside to preserve the appearance of the DIMENSION entity, if editing afterwards in a CAD application. |
dimtad |
1 = place the text vertical above the dimension line |
dim = msp.add_radius_dim(
    center=(0, 0),
    radius=2.5,
    angle=45,
    dimstyle="EZ_RADIUS"
)
dim.render()  # always required, but not shown in the following examples
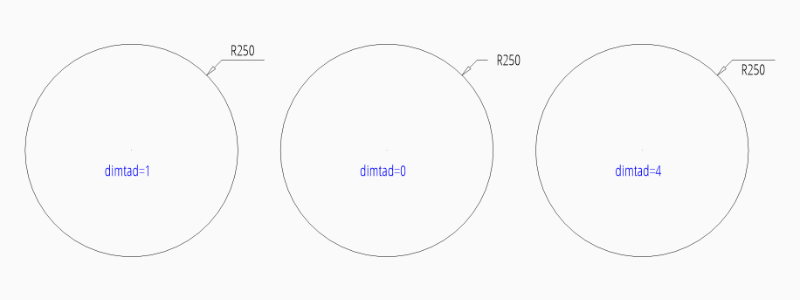
To force text outside horizontal set dimtoh
to 1:
dim = msp.add_radius_dim(
    center=(0, 0),
    radius=2.5,
    angle=45,
    dimstyle="EZ_RADIUS",
    override={"dimtoh": 1}
)
Default Text Locations Inside
DIMSTYLE “EZ_RADIUS_INSIDE” can be used to place the dimension text inside the circle at a default location.
The basic DIMSTYLE “EZ_RADIUS_INSIDE” settings are:
1 drawing unit = 1m
scale 1:100, length_factor is 100 which creates
the length factor
dimlfac= 100, which creates a measurement text in cm.uses a closed filled arrow, arrow size
dimasz= 0.25
Advanced “EZ_RADIUS_INSIDE” settings to place (force) the text inside of the circle:
tmove |
0 = moves the dimension line with dimension text, this is the best setting for text inside to preserve the appearance of the DIMENSION entity, if editing afterwards in a CAD application. |
dimtix |
1 = force text inside |
dimatfit |
0 = force text inside, required by BricsCAD and AutoCAD |
dimtad |
0 = center text vertical, BricsCAD and AutoCAD always create a vertical centered text, ezdxf let you choose the vertical placement (above, below, center), but editing the DIMENSION in BricsCAD or AutoCAD will reset text to center placement. |
dim = msp.add_radius_dim(
    center=(0, 0),
    radius=2.5,
    angle=45,
    dimstyle="EZ_RADIUS_INSIDE"
)
To force text inside horizontal set dimtih
to 1:
dim = msp.add_radius_dim(
    center=(0, 0),
    radius=2.5,
    angle=45,
    dimstyle="EZ_RADIUS_INSIDE",
    override={"dimtih": 1}
)
User Defined Text Locations
Beside the default location it is always possible to override the text location
by a user defined location. This location also determines the angle of the
dimension line and overrides the argument angle. For user defined locations
it is not necessary to force text inside (dimtix=1), because the location
of the text is explicit given, therefore the DIMSTYLE “EZ_RADIUS” can be used
for all this examples.
User defined location outside of the circle:
dim = msp.add_radius_dim(
    center=(0, 0),
    radius=2.5,
    location=(4, 4),
    dimstyle="EZ_RADIUS"
)
User defined location outside of the circle and forced horizontal text:
dim = msp.add_radius_dim(
    center=(0, 0),
    radius=2.5,
    location=(4, 4),
    dimstyle="EZ_RADIUS",
    override={"dimtoh": 1}
)
User defined location inside of the circle:
dim = msp.add_radius_dim(
    center=(0, 0),
    radius=2.5,
    location=(1, 1),
    dimstyle="EZ_RADIUS"
)
User defined location inside of the circle and forced horizontal text:
dim = msp.add_radius_dim(
    center=(0, 0),
    radius=2.5,
    location=(1, 1),
    dimstyle="EZ_RADIUS",
    override={"dimtih": 1},
)
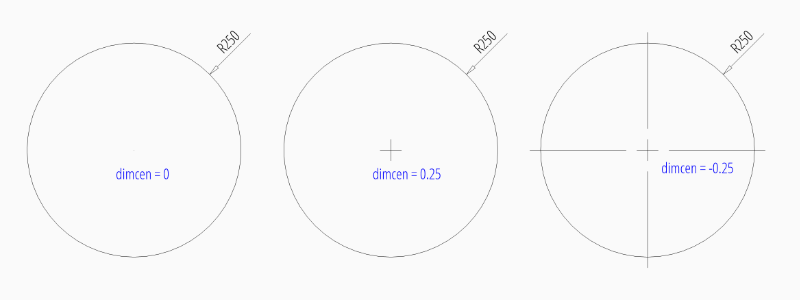
Center Mark/Lines
Center mark/lines are controlled by dimcen,
default value is 0 for predefined dimstyles “EZ_RADIUS” and “EZ_RADIUS_INSIDE”:
0 |
Center mark is off |
>0 |
Create center mark of given size |
<0 |
Create center lines |
dim = msp.add_radius_dim(
    center=(0, 0),
    radius=2.5,
    angle=45,
    dimstyle="EZ_RADIUS",
    override={"dimcen": 0.25},
)
Overriding Measurement Text
See Linear Dimension Tutorial: Overriding Measurement Text
Measurement Text Formatting and Styling
See Linear Dimension Tutorial: Measurement Text Formatting and Styling