Tutorial for Image Export
Introduction
This tutorial shows how to export DXF content of the modelspace or a paperspace as
images by the drawing add-on.
The tutorial covers the new added backends in ezdxf version 1.1:
ezdxf.addons.drawing.svg.SVGBackendclass for SVG exportezdxf.addons.drawing.pymupdf.PyMuPdfBackendclass for PDF and PNG exportezdxf.addons.drawing.hpgl2.PlotterBackendclass for PLT/HPGL2 exportezdxf.addons.drawing.dxf.DXFBackendclass for flattened DXF export
The tutorial does not cover the MatplotlibBackend
and PyQtBackend, for information about these
backends see:
Howtos for the Drawing Add-on
FAQs at github: https://github.com/mozman/ezdxf/discussions/550
Common Basics
The rendering process is divided into multiple steps. The frontend resolves the DXF properties and breaks down complex DXF entities into simple drawing primitives which are send to the backend that renders the output format.
import ezdxf
from ezdxf.addons.drawing import Frontend, RenderContext, svg, layout


def example_doc():
    doc = ezdxf.new()
    msp = doc.modelspace()
    x0, y0, x1, y1 = 0, 0, 10, 10
    start = (x0, y0)
    end = (x0 + 1, y0)
    for color in range(1, 6):
        msp.add_lwpolyline(
            [start, (x0, y1), (x1, y1), (x1, y0), end], dxfattribs={"color": color}
        )
        x0 += 1
        x1 -= 1
        y0 += 1
        y1 -= 1
        start = end
        end = (x0 + 1, y0)
    return doc


def export(doc):
    msp = doc.modelspace()
    # 1. create the render context
    context = RenderContext(doc)
    # 2. create the backend
    backend = svg.SVGBackend()
    # 3. create the frontend
    frontend = Frontend(context, backend)
    # 4. draw the modelspace
    frontend.draw_layout(msp)
    # 5. create an A4 page layout, not required for all backends
    page = layout.Page(210, 297, layout.Units.mm, margins=layout.Margins.all(20))
    # 6. get the SVG rendering as string - this step is backend dependent
    svg_string = backend.get_string(page)
    with open("output.svg", "wt", encoding="utf8") as fp:
        fp.write(svg_string)


if __name__ == "__main__":
    export(example_doc())
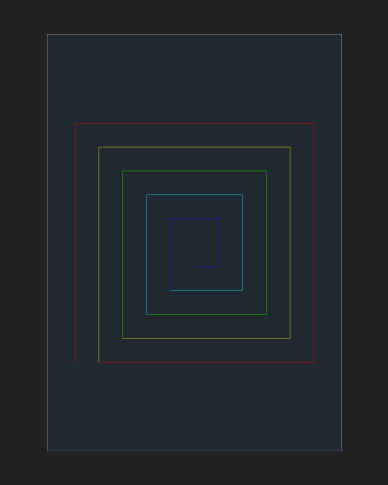
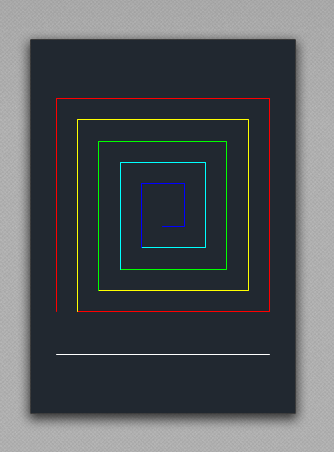
The exported SVG shows a spiral centered on an A4 page with a margin of 20mm, notice the background has a dark color like the usual background of the modelspace:
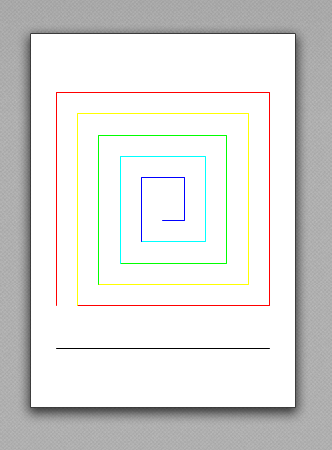
Frontend Configuration
The Configuration object configures the rendering
process. This example changes the background color from dark grey to white and renders
all lines black.
Add the config module to imports:
from ezdxf.addons.drawing import Frontend, RenderContext, svg, layout, config
Create a new configuration and override the background and color policy between the 2nd and the 3rd step:
    # 2. create the backend
    backend = svg.SVGBackend()
    # create a new configuration for a white background and and a black foreground color
    cfg = config.Configuration(
        background_policy=config.BackgroundPolicy.WHITE,
        color_policy=config.ColorPolicy.BLACK,
    )
    # 3. create the frontend
    frontend = Frontend(context, backend, config=cfg)
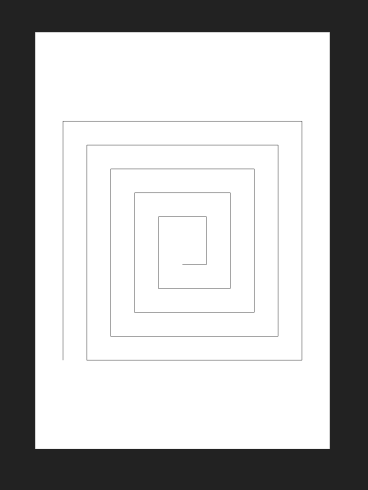
The new exported SVG has a white background and all lines are black:
There are many configuration options:
LineweightPolicy- relative, absolute or relative fixed lineweight
LinePolicy- solid or accurate linetypes
HatchPolicy- normal, ignore, only outlines or always solid fill
ColorPolicy- color, black, white, monochrome, …
BackgroundPolicy- default, black, white, off (transparent) and custom
TextPolicy- filling, outline, ignore, …
ProxyGraphicPolicy- ignore, show, preferlineweight scaling factor
minimal lineweight
max_flattening_distance for curve approximation
and more …
All configuration options are documented here: Configuration.
Page Layout
The Page object defines the output page for some
backends (SVG, PDF, PNG, PLT).
A page is defined by width and height in a given length unit. The supported length units are millimeters (mm), inch (in), point (1 pt is 1/72 in) and pixels (1 px is 1/96 in).
It’s possible to autodetect the page size from the content or fit the content onto the page. In both cases the margin values are used to create space between the content and the page borders. The content is centered in the remaining space without margins.
Important
None of the backends crop the content automatically, the margin values are just calculation values!
Autodetect Page Size
The required page size is auto-detected by setting the width and/or height to 0. By default the scaling factor is 1, so 1 drawing unit is 1 page unit. The content is fit to page by default and the outcome is shown in the previous examples.
This example shows the output when the scale should be 1:1, 1 drawing unit is 1 page unit (mm):
    # auto-detect page size and 2mm margins on all sides
    page = layout.Page(0, 0, layout.Units.mm, margins=layout.Margins.all(2))
    # scale content by 1, do not fit content to page
    svg_string = backend.get_string(
        page, settings=layout.Settings(scale=1, fit_page=False)
    )
The page has a size of 14x14mm, a content size of 10x10mm and 2mm margins on all sides.
Scaling Content
Scaling the content by factor 10 means, 10 page units represent 1 drawing unit, which is a scale of 10:1 and only uniform scaling is supported.
def export_2(doc):
    backend = make_backend(doc)
    # auto-detect page size and 2mm margins on all sides
    page = layout.Page(0, 0, layout.Units.mm, margins=layout.Margins.all(2))
    # scale content by 10, do not fit content to page
    svg_string = backend.get_string(
The page has a size of 104x104mm, a content size of 100x100mm and 2mm margins on all sides.
Limit Page Size
The page arguments max_width and max_height can limit the page size in auto-detection mode, e.g. most plotter devices can only print upto a width of 900mm.
SVG Export
The steps to export a SVG by the SVGBackend are show
in the first example, the configuration of the frontend and the page setup are shown in
the previous sections.
Create the render context
Create the backend
Create and configure the frontend
Draw the content
Setup the page layout
Create the SVG output string
This is the same code as for the first example:
def export(doc):
    msp = doc.modelspace()
    # 1. create the render context
    context = RenderContext(doc)
    # 2. create the backend
    backend = svg.SVGBackend()
    # 3. create the frontend
    frontend = Frontend(context, backend)
    # 4. draw the modelspace
    frontend.draw_layout(msp)
    # 5. create an A4 page layout, not required for all backends
    page = layout.Page(210, 297, layout.Units.mm, margins=layout.Margins.all(20))
    # 6. get the SVG rendering as string - this step is backend dependent
    svg_string = backend.get_string(page)
    with open("output.svg", "wt", encoding="utf8") as fp:
        fp.write(svg_string)
The SVG backend flips the coordinates along the y-axis and transforms the content into a compact integer coordinate space and produces therefore a small file size but therefore the output coordinates are different to the DXF coordinates.
PDF Export
The PDF export requires the the PyMuPdf package to be installed.
The steps to export a PDF are very similar to SVG, except for the
PyMuPdfBackend class and the backend returns bytes
and not a string:
Create the render context
Create the backend
Create and configure the frontend
Draw the content
Setup the page layout
Create the SVG output string
Import the pymupdf backend module:
from ezdxf.addons.drawing import Frontend, RenderContext, pymupdf, layout, config
The export function:
def export_dark_bg(doc):
    msp = doc.modelspace()
    # 1. create the render context
    context = RenderContext(doc)
    # 2. create the backend
    backend = pymupdf.PyMuPdfBackend()
    # 3. create the frontend
    frontend = Frontend(context, backend)
    # 4. draw the modelspace
    frontend.draw_layout(msp)
    # 5. create an A4 page layout
    page = layout.Page(210, 297, layout.Units.mm, margins=layout.Margins.all(20))
    # 6. get the PDF rendering as bytes
    pdf_bytes = backend.get_pdf_bytes(page)
    with open("pdf_dark_bg.pdf", "wb") as fp:
        fp.write(pdf_bytes)
The PDF has is dark background for the modelspace by default and color index 7 is white.
Create a frontend configuration and override the BackgroundPolicy to get a
white background:
    # 3. create and configure the frontend
    cfg = config.Configuration(background_policy=config.BackgroundPolicy.WHITE)
    frontend = Frontend(context, backend, config=cfg)
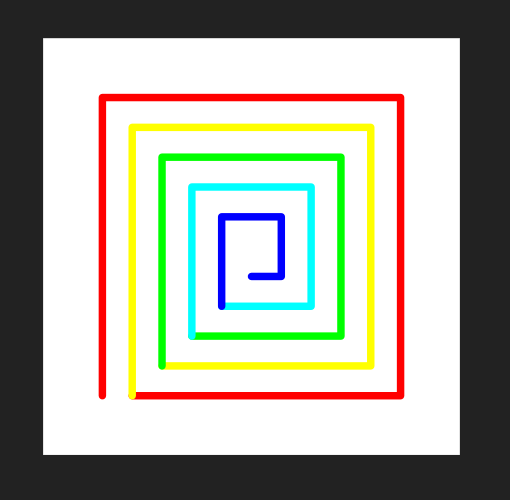
Now the exported PDF has a white background and color index 7 is black:
PNG Export
The PNG export is done by the PyMuPdfBackend
class and differs only in the method to get the PNG data bytes:
    # 6. get the PNG rendering as bytes
    png_bytes = backend.get_pixmap_bytes(page, fmt="png", dpi=96)
    with open("png_white_bg.png", "wb") as fp:
        fp.write(png_bytes)
The pymupdf backend supports multiple image formats:
png |
Portable Network Graphics |
ppm |
Portable Pixmap (no alpha channel) |
pbm |
Portable Bitmap (no alpha channel) |
PLT/HPGL2 Export
The PlotterBackend creates HPGL/2 plot files for
output on raster plotters. The PlotterBackend is designed to print on white
paper, so the background color is always white and color index 7 is black by default.
Warning
The plot files are only tested by the plot file viewer ViewCompanion Standard but not on real hardware - please use with care and give feedback.
The PLT/HPGL2 export is very similar to the SVG export:
from ezdxf.addons.drawing import Frontend, RenderContext, hpgl2, layout


def export(doc):
    msp = doc.modelspace()
    # 1. create the render context
    context = RenderContext(doc)
    # 2. create the backend
    backend = hpgl2.PlotterBackend()
    # 3. create the frontend
    frontend = Frontend(context, backend)
    # 4. draw the modelspace
    frontend.draw_layout(msp)
    # 5. create an A4 page layout
    page = layout.Page(210, 297, layout.Units.mm, margins=layout.Margins.all(20))
    # 6. get the HPGL2 rendering as bytes
    plt_bytes = backend.get_bytes(page)
    with open("output_01.plt", "wb") as fp:
        fp.write(plt_bytes)
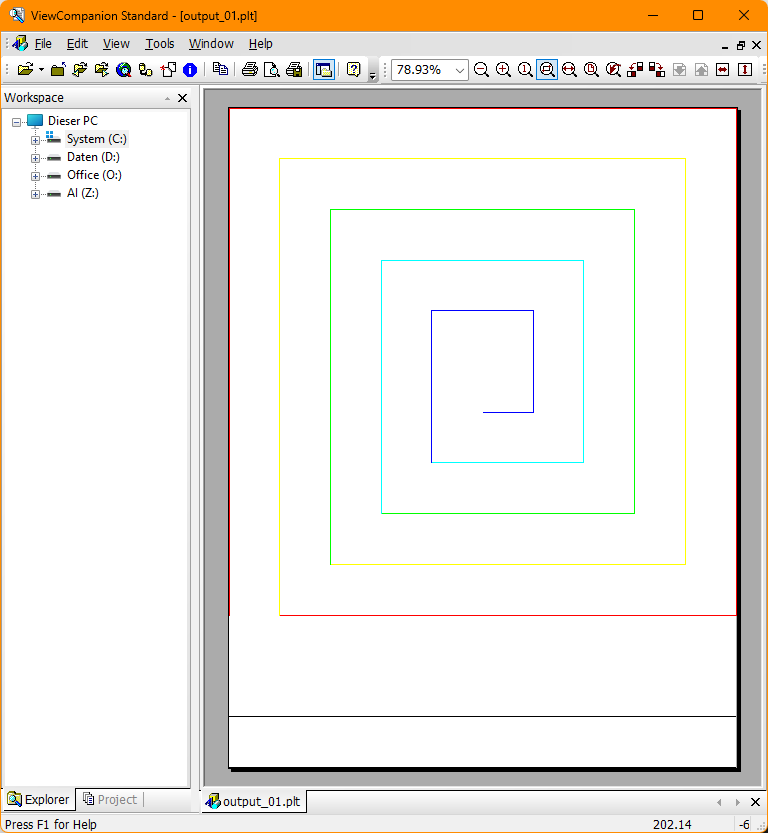
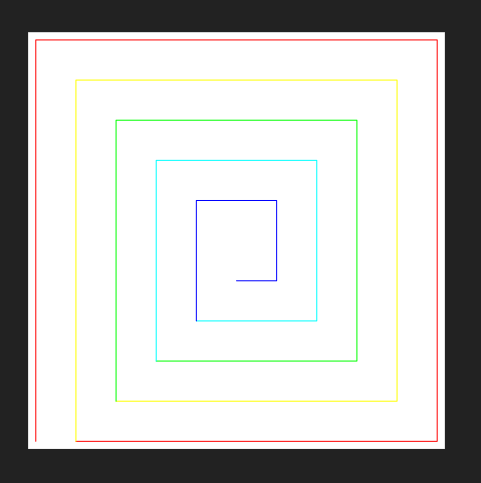
The HPGL/2 viewer does not show the margins around the content, but most construction drawings draw the page borders around the content.
The PlotterBackend has some quality preset methods to get the HPGL/2 data:
The difference are mostly the floating point precision and the usage of Bézier curves, but the Bézier curves are approximated by plotter drivers (even by HP drivers), so there is no real quality improvement, but curves need less space than approximated polylines so the file size is smaller.
Very old plotter may not support Bézier curves and floating point coordinates, for these
plotters the compatible() method exports only polylines and integer coordinates.
Usage:
# 6. get the HPGL2 rendering as bytes
plt_bytes = backend.high_quality(page)
DXF Export
The DXFBackend exports the content as DXF primitives:
POINT, LINE, LWPOLYLINE, SPLINE and HATCH. All blocks are exploded, text is
rendered as filled polygons represented by the HATCH entity and arcs are represented by
SPLINE entities (internal Bèzier curve representation).
This backend was added to convert HPGL/2 files to DXF files, because the
hpgl2 add-on reuses the backends of the drawing add-on for export.
Maybe it is useful for other tasks too.
This backend works different than the previous. There is no page setup and everything is rendered into a given layout of a DXF document:
from ezdxf.addons.drawing import Frontend, RenderContext, dxf


def export(doc):
    export_doc = ezdxf.new()
    msp = doc.modelspace()
    # 1. create the render context
    context = RenderContext(doc)
    # 2. create the backend
    backend = dxf.DXFBackend(export_doc.modelspace())
    # 3. create the frontend
    frontend = Frontend(context, backend)
    # 4. draw the modelspace
    frontend.draw_layout(msp)
    # 5. save or return DXF document
    export_doc.saveas("output_01.dxf")
Recorder Backend
The Recorder backend is an intermediate layer to
record the drawing commands of the Frontend class.
The Player object can replay this records on any
other backend class but also provides some additional features like bounding box
detection, content transformation and cropping.
The SVG/PDF/PLT backends use this intermediate layer internally to transform and place the content.